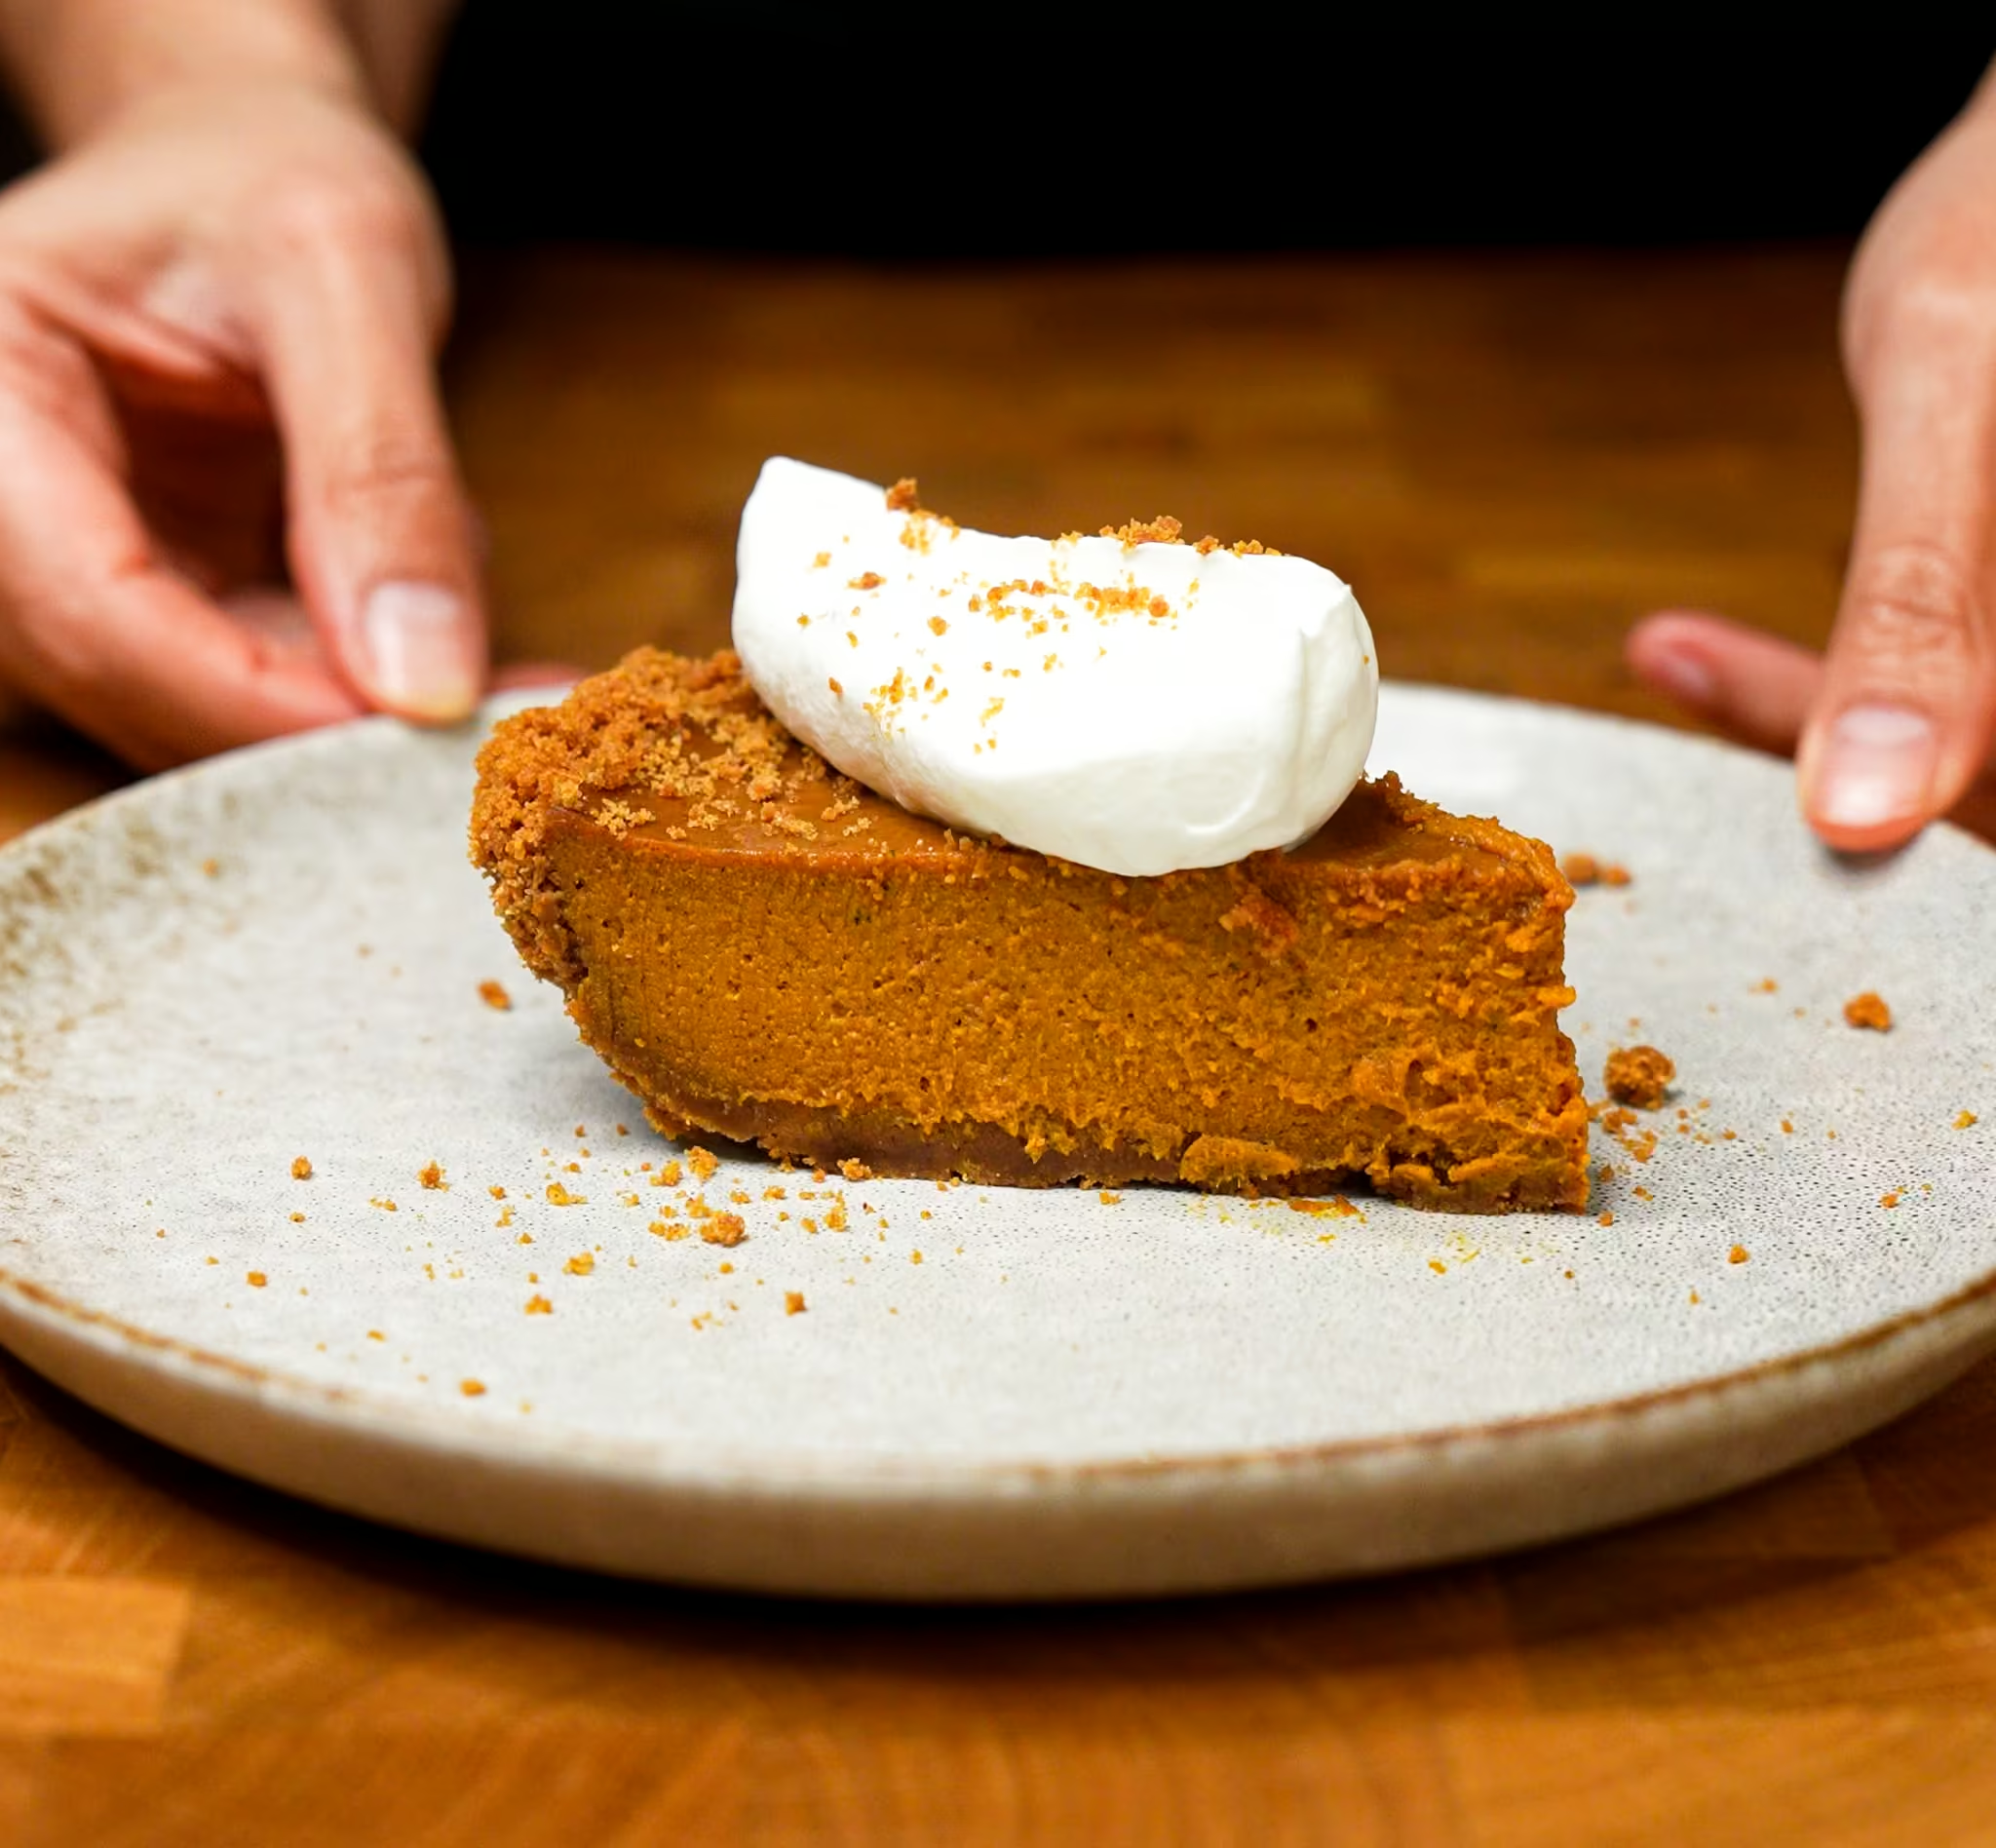
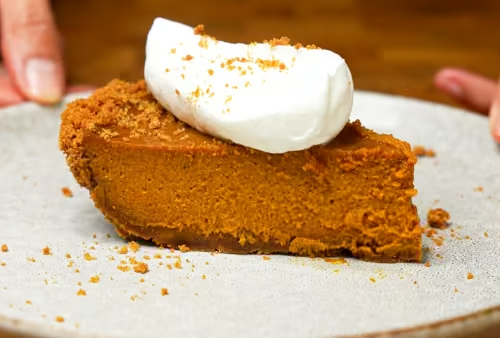
Creamy Dulce de Leche Pumpkin Pie in a Biscoff Crumb Crust


My pumpkin pie is very thick and creamy, featuring an intense roasted pumpkin filling infused with browned butter, warm spices, and dulce de leche. It’s nestled in a Biscoff cookie crust that complements the spices and adds a touch of saltiness. Like all my pumpkin desserts, I start by making a spiced pumpkin butter. This pre-cooking step intensifies the pumpkin flavor by frying it in brown butter and removing excess moisture, resulting in a rich, luscious pie.
One of the most common questions I've been getting about this pie (and super important, given the amount of preparation we all do for holiday cooking) is:
Can my pumpkin pie be made ahead of time?
Yes! Please make it in advance to save yourself some effort.
Eating the pie the day that it's made and 2-3 days later is equally tasty and has no bearing on the texture. In fact, I think the spices are a little more pronounced the day after. The preparation of this pie is very similar to what I often do when making curry pastes, in that I bloom the spices in hot fat (butterfat in this case) to release those delicious flavor compounds into the dish. Same concept here.
To make this pie ahead of time, complete the recipe, including the final cooling step (2 hours at room temperature) to bring the custard's internal temperature down. Then, take a piece of plastic wrap and lightly spray or coat it with a cooking oil. Place that on top of your pie, then put the pie in the fridge. That's it! Leave it in there until you're ready to serve, 1-3 days later. The pie is delicious cold from the fridge (I often have so much leftover pie that I'm guilty of doing this for my breakfasts - I know) or warmed up slightly, either naturally to room temperature or a bit in the microwave.
The only thing you have to remember is to cool the pie as indicated in the recipe below. If you skip the cooling steps and put the pie in the fridge too quickly, the egg proteins will shrink faster than the custard structure can withstand, causing a crack in your beautiful pie.
What is the flavor of my Pumpkin Pie?
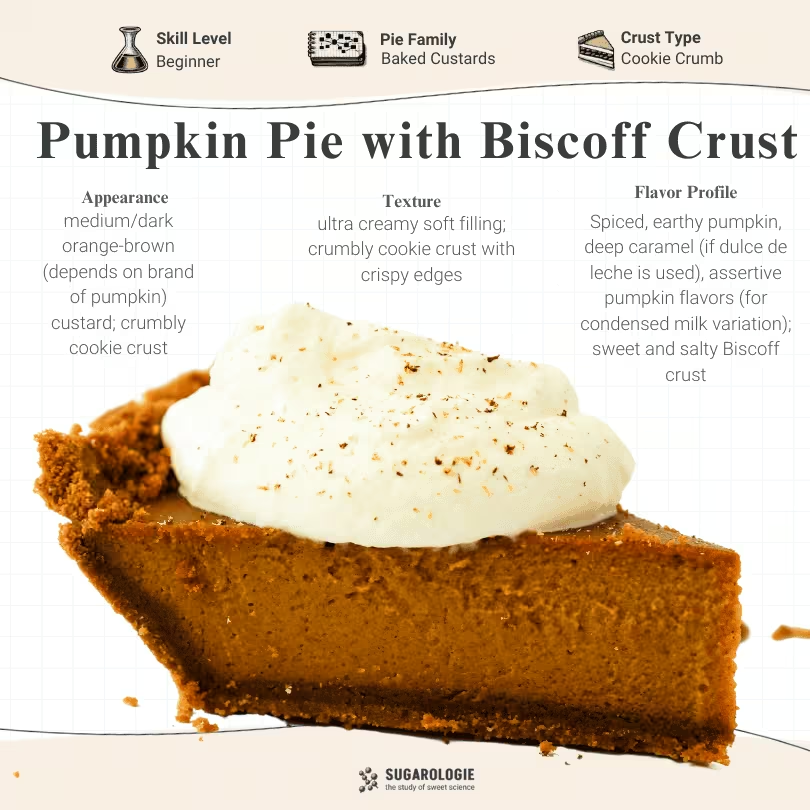
My pumpkin pie features a rich flavor profile, beginning with spiced roasted pumpkin and complemented by sweet, milky undertones. I apply the same logic to all my vegetable-based desserts (such as my carrot cake and pumpkin pie bread) in that I try to extract the maximum flavor from the vegetables before baking with them.
I prepare pumpkin butter by browning butter and infusing it with spices in this recipe. This hot butterfat absorbs and intensifies the spice flavors. Next, I add pumpkin puree, which fries in the flavorful butter, enhancing the pumpkin flavors.
Based on my research into various dairy products for cookie and frosting recipes, I knew I wanted to use dulce de leche in my pumpkin pie for its rich, roasted flavor that pairs beautifully with pumpkin.
However, I've also developed this recipe for either dulce de leche or condensed milk and summarized the differences below:

What is the texture of my Pumpkin Pie?
I aimed for a creamy and luscious texture in this pie. I had done some trials last year on different cheesecakes, and I kept thinking about the creaminess of a Basque-style cheesecake and how I wanted something similar in my pumpkin pie.
Now, this is not quite as creamy as a cheesecake because there is far less fat in this pumpkin custard than a cheesecake custard, but I’ve implemented specific techniques to enhance the creamy texture of the pumpkin custard.
- Use a food processor.
It’s not essential, but it will help homogenize the pumpkin filling. Sometimes canned pumpkin can be a bit fibrous, and that’s a great texture, too, but if you’re aiming for the ultimate creamy texture, try to use a food processor or blender (standard or immersion) when preparing the pumpkin filling. - Use a higher ratio of butterfat.
The butter is essential for texture as it creates a creamier mouthfeel but also prevents the egg proteins from sticking together so easily, which can cause an uneven or even curdled texture in the filling. - Bake on super-low heat.
I bake my pie at 300 °F/150 °C to ensure a slow increase in temperature. This is essential for ensuring the egg proteins form a solid gel in the custard rather than quickly and haphazardly clumping together tightly. This can also cause clumping, curdling, or the dreaded cracked filling. - Bake with a small bowl of water in the oven.
This creates a steamy environment in the oven while the custard bakes, which is typically a very dry environment. Since my pumpkin pie filling has less moisture, I want to ensure that not too much evaporation occurs on the surface, which can also lead to cracked custards.
Step by step:
STEP 1 | BAKE THE BISCOFF COOKIE CRUST.

Add the Biscoff cookies, flour, brown sugar, and salt to a food processor or zip-top bag. Process (or smash) until you get sandy crumbs (1a). Add the crumbs and melted butter to a pie pan and mix until fully combined (1b).

Use your fingers (or a flat-bottomed cup is better) to flatten the crumbs evenly against the pan's surface (1c, d) and bake for 10 minutes.
STEP 2 | PREPARE AND PORTION OUT INGREDIENTS FOR PUMPKIN FILLING.
Step 3 makes the pumpkin butter, which requires having the ingredients handy during the heating process. So you’ll need to put all your spices (cinnamon, ginger, and nutmeg) in a small bowl and the milk powder in a separate bowl. Also, have your can of pumpkin puree open and ready.
STEP 3 | COOK THE PUMPKIN BUTTER.

First, we have to brown the butter. Cut unsalted butter into large chunks and place them in a light-colored pan. Heat over medium-low, stirring occasionally (2a). Once the butter begins to foam and the foam settles, stir constantly until medium-brown specks form at the bottom (2b). Remove the pan from heat immediately to prevent burning the milk solids.

If using the milk powder, immediately sprinkle it over the top of the butter, stirring constantly until the butter foams up a little and turns a golden brown. Scrape the bottom of the pan to ensure there are no milk powder clumps. You may need to turn on the heat to low to get a brown color. Turn the heat back off again.

Add the spice mix to the browned butter, stirring constantly until evenly distributed and fragrant, about 30 seconds (3e, f).
Notice how dark it becomes—the result of the naturally darker spices. We add the milk powder first because it can blend in with the dark spices, making it hard to see when it browns. This process should fill your kitchen with delightful, warm, spiced aromas!

Use a spatula and mix all the pumpkin puree with the spiced butter until it resembles an oily pumpkin butter (3g).
Return the mixture to medium-low heat, stirring for 30 seconds to remove some water from the pumpkin puree and thicken it. This also combines the flavors of everything before it goes into the pie (3h).
STEP 4 | COMBINE THE SUGARS AND EGGS WITH THE PUMPKIN BUTTER.
You can do this step manually with a whisk and a large bowl, but I will show you my favorite way: the food processor.

My favorite (and lazy) way to make the filling is with a food processor. I don’t wash the processor from the Biscoff crust step. I add the hot pumpkin butter with the dulce de leche (or condensed milk + flour), brown sugar, and salt (4a, b).

Process until homogenous in color and texture; with my machine, it takes one full minute (4c).

The mixture should still be warm, but it’s not hot enough to cook the eggs, so I just add the cold eggs (4d) and vanilla and process until it is completely smooth (4e).

Pour the warm pumpkin pie filling into the cookie crust (4e, f). (It’s ok if the crust/pan is still warm from baking.)
STEP 5 | BAKE FOR 50 TO 60 MINUTES OR UNTIL SET.
The timing for custard pies isn't fixed; it varies based on factors like the depth and material of your pan, the temperature of your ingredients, and your oven's heating capabilities.
So, let me teach you how to recognize the signs that indicate when this pumpkin pie is done. This will prevent undercooked and runny or overcooked and curdled pies.

The best way to check for doneness is with an instant-read thermometer. The pie is done when the direct center reads 160-165°F (71-74°C). I start checking at 45 minutes and then every 5-10 minutes. While this may leave a small hole in the center, I’m a substance-over-style baker who prioritizes a perfectly cooked custard over a flawless top. Plus, that’s what whipped cream is for.
Wiggling it while it's hot is an alternative to check if the pie is set. This is less reliable because it’s not a quantifiable observation. Also, it’s inconsistent as different custards can have various compositions that will affect how they “wiggle.”
I’ll try my best, though, and here’s what I’ve observed with my pies:
If you used La Lechera Dulce de Leche:
This variation causes the pie to set more firm due to the agar in the dulce de leche. This pie's interior will shake like a very firm Jello when shaken.
If you used runnier types of dulce de leche or condensed milk:
This variation causes the pie to set medium firm. The pie's interior will shake like somewhat firm Jello.
I’ve also noticed that this pie is finished as it starts to form the slightest hairline cracks around the perimeter. I’ve tracked the internal temperatures of the perimeters vs. the middle and have observed that as the perimeter starts to set and crack, the middle is setting. You can kind of see one forming in the 2 o'clock position in the picture above.
STEP 6 | ALLOW THE PIE TO COOL BRIEFLY IN THE OVEN.
Once the pie has reached 165 °F, turn off the oven and crack the door to allow heat to escape slowly. I usually just prop a folded oven mitt to allow the hot air to escape. (Please be mindful of small children and pets.) This slowly reduces the oven's ambient air temperature and lets the custard filling cool gradually. Let the pie sit like that for 30 minutes.
Move the pie out to a warm-ish spot (mine is on top of my stove) and let the pie sit out at room temperature to cool for 2 hours. You can then serve it at room temperature or lightly cover the top with plastic wrap and place it in the fridge to serve later in the day.
Video
Honors Members Section
This extra material is accessible to Sugarologie Honors members.
Become a member to view extended research notes, technique analysis, and supplemental materials! Learn more about Sugarologie Honors here.
Already a member?
How I built this recipe:
To create this recipe, I had to think about conventional pumpkin pie, which is a custard partially encased in either pastry shells or crumb-cookie bases. These custards, by definition, entail a cooked preparation of dairy, sugar, eggs, and sometimes a starch, with the ratio of eggs being the primary determinant of how firm the custard becomes. Getting the ratio of sugar and fat to egg proteins will ensure the custard bakes up nice and creamy instead of rubbery.
And usually, there is quite a bit of dairy in these types of pies, by way of evaporated milk. If we take a look at the classic Libby’s Pumpkin Pie recipe:
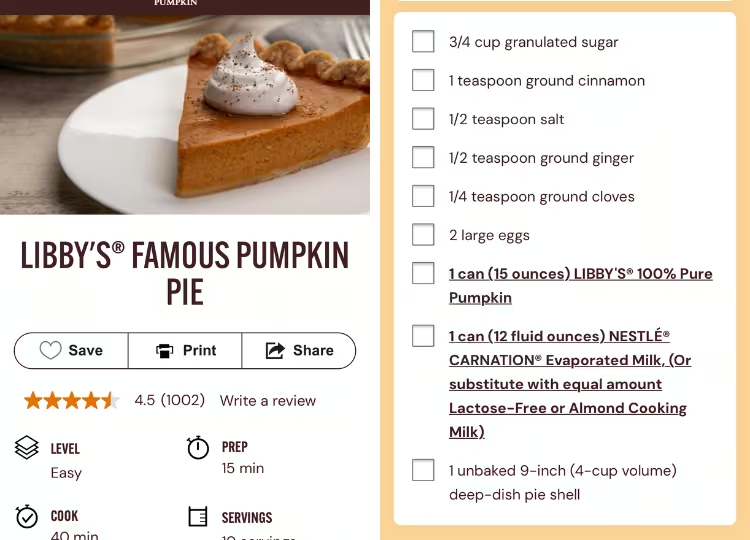
You can see a large portion of the water is coming from evaporated milk. This lends a very dairy-forward flavor to the custard. But I often get asked about the difference between milk, evaporated milk, and condensed milk. Check out this visual I made, paying close attention to the nutrient (protein, fat, water) content of each milk product:
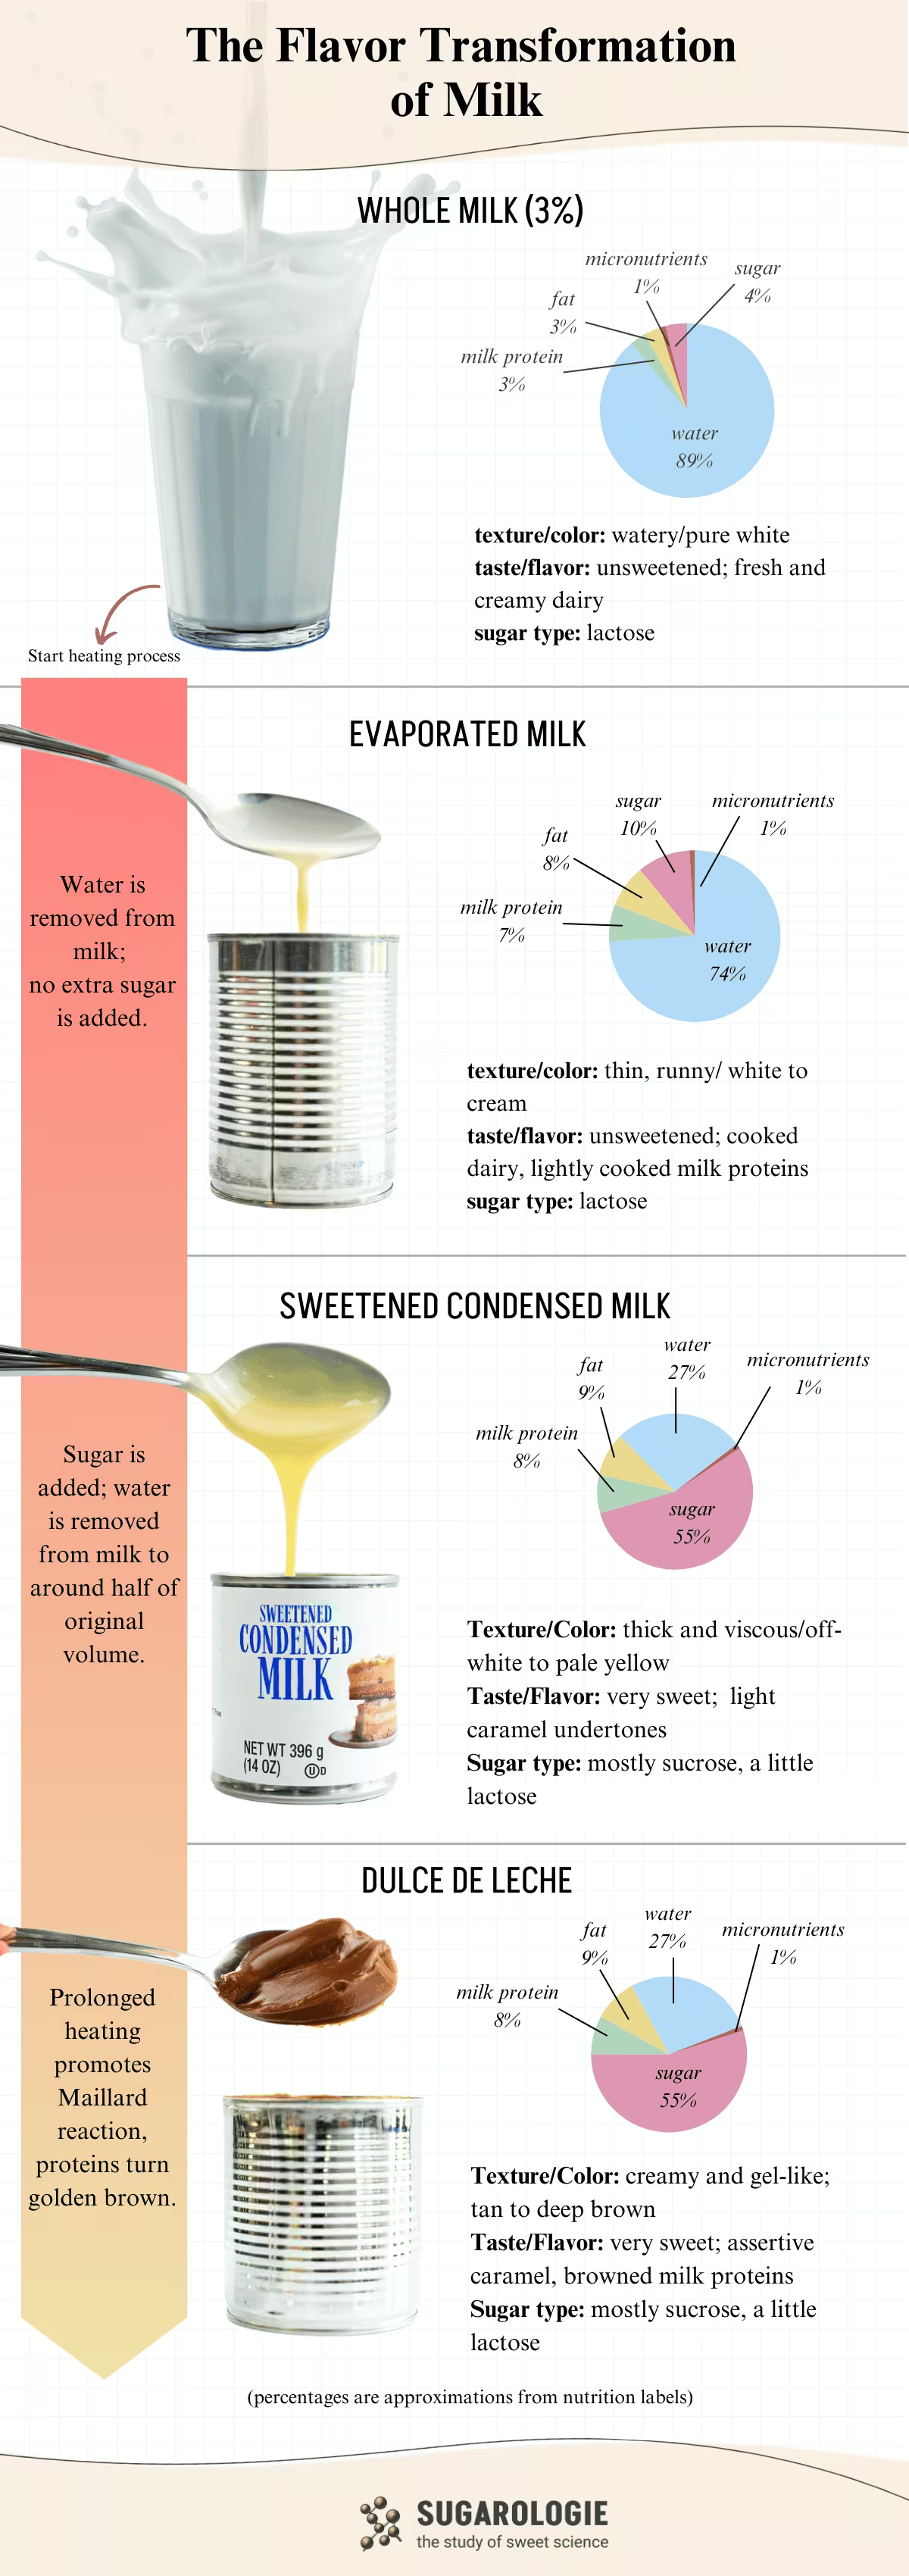
So as a recipe developer, once we understand these transitions and how all these ingredients are related, we can easily make substitutions. I can now add more flavor to my custard via condensed milk or dulce de leche, I just have to account for the increase in sugar and decrease in water.
Dulce de leche is one of my favorites for creating a depth of flavor in my baking. It is the epitome of the Maillard reaction, which makes the most flavorful roasted and toasted flavors. In baking, however, the Maillard reaction is sometimes difficult to achieve because it requires higher temperatures, and often we are restricted to a very limited time frame for exposing ingredients.
So what I did was take a Libby’s pumpkin pie custard and reformulated it quite a bit. I wanted to infuse as much pumpkin flavor as possible so I aimed to use an entire can of pumpkin puree in one pie. No problem, except for the fact that the pumpkin has a ton of water in it. So I did what I do for all my pumpkin desserts - I made a spiced pumpkin butter. This contains browned butter, milk powder, spices, and pumpkin puree. I also cooked off a bit of water so I could accommodate the extra bulk and liquid from an extra egg and the dulce de leche. Typically, to approximate the amount of water I’ve cooked off, I’ll take the weight of everything before and after cooking. That gives me some numbers to work with as I move on to the next step: adding the sugars.
Now, because I wanted to use dulce de leche for this custard, I used the approximate sugar content of commercially available dulce de leche to estimate how much more sugar I needed to add to achieve the right sweetness. I don’t like to make things overly sweet, so you’ll see I didn’t end up adding too much - just a few tablespoons of brown sugar.
Now the important part - the eggs. This contains proteins that are essential for setting up the custard and ensuring it has a nice soft texture when sliced. Often during recipe development, I consider the total protein content, and I typically use 5-10% total protein for a set custard (including cheesecakes). And because this pumpkin pie custard has other setting elements (in the dulce de leche) and protein from different sources (from the pumpkin), I’m only using around 2% egg protein.
Combining all of these ingredients in a food processor gives me the smoothest result, and honestly, creates the most flavorful pumpkin pie I’ve ever had.
Before starting the recipe, please read this!
Measure by weight, if possible.
Measuring by weight is the best way for you to replicate my recipes. I develop recipes using ingredients (even liquids) measured in grams, which is why you see them listed first in the recipe cards. For measurements under 5 grams, I will typically only list the volumetric measurements (teaspoons, etc.), as most home scales are not precise for such small weights.
In most cases, I have converted grams to volumetric measurements (aka US customary units) for bakers who prefer this method. However, the measurements are not as precise and may have awkward proportions. The recipes should still work, but for the ultimate precision, try to use weight.
This is the OXO scale I use daily. I also purchased this budget version of a good scale, which I keep at my Mom’s house for baking. If you’re interested in other tools I use for my baking, I’ve compiled a list here.
Use room temperature ingredients.
All my ingredients should be used at room temperature, or 65-75 °F/18-24 °C. I will always indicate if you need something outside this range. If no details are given, room temperature is the default.
Pay attention to the ingredient descriptions.
I try not to be brand-specific, but I will always note an interesting result from a type of ingredient, be it negative or positive.
A specific note regarding salt: I use Diamond Crystal Kosher salt for everything on this site except for frostings. In frostings, you want the salt to dissolve more easily, and kosher salt tends to leave granules behind. If you substitute table salt (more finely granulated) for recipes that list kosher salt, you must use half the volume indicated in my recipes.
Substitutions are hard.
That said, substitutions aren’t impossible but can be the toughest part of recipe development. Small swaps, like reduced-fat milk (2% fat) for whole milk (3.5% fat), usually work fine. However, bigger changes—such as replacing oil with applesauce or sour cream with Greek yogurt—can significantly impact texture and density.
Be wary of general, all-purpose substitutions in baking; I find that usually there is never a one size-fits-all solution. I carefully select ingredients for my recipes, so for the best results, start with the original recipe and modify with caution.
Read all the recipe instructions before beginning.
I’m in the “Pre-read the Chapter before Class Lecture” club... and I invite you to join! Baking new recipes can be intimidating, so let’s set you up for success. I want you to think about timeframes. Most fillings and frostings can be made ahead of time, and give you an extra day for mental space. Also, as you become a more proficient baker, you can anticipate and recognize steps. (“Oh, this has a meringue step, so I’ll need an extra clean bowl…” etc.) Ensure you go down the ingredient list and have everything at the right temperature.

.avif)
.avif)
%20(2).avif)
Dulce de Leche Pumpkin Pie with Biscoff Crust
For the Cookie Crust:
- 56 g (4 tablespoons) unsalted butter, melted
- 200 g (7 oz or about 25 cookies) Biscoff Cookies
- 23 g (3 tablespoons) all-purpose flour, bleached or unbleached
- 13 g (1 tablespoon) brown sugar, light or dark
- ½ teaspoon kosher salt
For the Pumpkin Filling:
- 6 g (1 tablespoon) milk powder, any type (optional, but yummy*)
- 1 teaspoon ground cinnamon
- 1 teaspoon ground ginger
- ½ teaspoon ground nutmeg, freshly grated is best if you can
- ¼ teaspoon of ground cardamom and/or allspice (optional but yummy!)
- 425 g (1 ¾ cups, or one 15 oz. can) pure canned pumpkin**
- 56 g (4 tablespoons) unsalted butter, cold from the fridge
- 306 g (1 cup) dulce de leche***
- 40 g (3 tablespoons) brown sugar, light or dark
- 1 ¼ teaspoons kosher salt
- 3 large (150 g) eggs, cold from fridge
- 2 teaspoons vanilla extract
Serve this with my Whipped Cream Cheese or any of my Stabilized Whipped Creams
- Bake the Biscoff Crust.
Have an oven rack in the middle position and preheat to 350°F (180°C).
Melt the butter in a medium or large light-colored pan and set that aside for now. (You’re going to use the pan again in step 3.)
Add the Biscoff cookies, flour, brown sugar, and salt to a food processor or zip-top bag. Process (or smash) until you get very fine, sandy crumbs.
Pour the crumbs into the 9-inch pie pan and add the melted butter. Use a spatula to distribute the butter evenly. Then, press the crumbs firmly into the pan using a flat bottom cup; try to get an even thickness for the bottom and sides.Bake for 10 minutes. The crust will turn a deeper brown and smell like toasty cookies.
Turn the oven down to 300 °F (150 °C) and carefully place a heat-proof bowl filled with water on the bottom rack of the oven. (I just use another pie plate.)
- Prepare and portion out your recipe components for the Pumpkin Filling.
If using, measure the milk powder in a small bowl.
Add the ground cinnamon, ginger, and nutmeg in another small bowl.Have the canned pumpkin puree open. Set all these things aside.
- Cook the pumpkin butter.
First, we have to brown the butter. Cut unsalted butter into large chunks and place them in a light-colored pan. Heat over medium-low, stirring occasionally. Once the butter begins to foam and the foam settles, stir constantly until medium-brown specks form at the bottom. Remove the pan from heat immediately to prevent burning the milk solids.
If using the milk powder, immediately sprinkle it over the top of the butter, stirring constantly until the butter foams up a little and turns a golden brown. Scrape the bottom of the pan to ensure there are no milk powder clumps. Add the spice mix, stirring constantly, until evenly distributed and fragrant (about 30 seconds). Mix in all the pumpkin puree until it resembles an oily pumpkin butter.
Return the mixture to medium-low heat, stirring constantly for 30 seconds to remove some water from the pumpkin puree and thicken it.
- Combine sugars and eggs with the pumpkin butter.
My favorite (and lazy) way to make the filling is with a food processor. I don’t wash the processor from the Biscoff crust step. I add the hot pumpkin butter and process that with the dulce de leche (or condensed milk + flour), brown sugar, and salt until smooth and homogenous in color, for 1 full minute. The mixture should still be warm, but it’s not hot enough to cook the eggs, so I just add the cold eggs and vanilla and process until it's completely smooth.
You can also prepare the filling manually with a large mixing bowl and a whisk.
Pour the warm pumpkin pie filling into the cookie crust. (It’s ok if the crust/pan is still warm from baking.)
- Bake for 50 to 60 minutes or until set.
The exact timing to set the custard will depend on the depth of your pan, the temperature of your ingredients, and the oven’s heating capabilities. Therefore, learning ways to assess doneness for your pie is important.
The best way to check for doneness is with an instant-read thermometer, which should read 160-165°F (71-74°C) in the direct center of the pie. I start checking at 45 minutes and check every 5 minutes after that. If you prefer a softer consistency for the final pie, aim for 160. If you prefer a firmer custard, 165. Yes, it will leave a slight hole in the center of your pie, but I’m more concerned with the guarantee that I have a perfectly cooked custard rather than a perfect top.
An alternative to assess doneness is to wiggle the pie to determine the texture. This method is less precise and inconsistent as different custards can have various compositions that will affect how they are set.
Here’s what I’ve observed with my pie:
If you used La Lechera Dulce de Leche:
This variation causes the pie to set more firm due to the agar in the dulce de leche. This pie's interior will shake like a very firm Jello when shaken.
If you used runnier types of dulce de leche or condensed milk:
This variation causes the pie to set medium firm. The pie's interior will shake like somewhat firm Jello. - Allow the pie to cool briefly in the oven before moving to room temperature to reduce the chance of the custard cracking.
Once the pie has set, turn off the oven and crack the door to allow heat to escape slowly. This slowly reduces the oven's ambient air temperature and lets the custard filling cool gradually. Let the pie sit like that for 30 minutes.
Move the pie out to a warm-ish spot (mine is on top of my stove) and let the pie sit out at room temperature to cool for 2 hours. You can then serve it warm or place it in the fridge, covered with plastic wrap sprayed with a bit of cooking spray (to protect the surface of the pie) and serve within the next 48 hours.

Recipe Card - Adriana's Notes
*Milk powder adds more roasty flavors to the pumpkin filling. You can use nonfat, whole, or buttermilk powder. Make sure it’s not clumpy before adding it to the hot butter.
**While homemade pumpkin puree may be tempting, using canned pumpkin ensures consistency in the recipe due to the uniformity of its components (water, starches, sugars, etc.). Many bakers prefer Libby’s brand, but I recommend Target’s Good & Gather for its brighter orange color if that matters to you.
***I’m using the canned La Lechera brand of dulce de leche in the photos above, which is available in most US markets.
If you’d like to use condensed milk, use the same amount as the dulce de leche, but also add ½ tablespoon of flour with the condensed milk when mixing it into the puree. This makes it an equal substitution for the canned dulce de leche, which is a bit thicker than condensed milk.
The key differences between condensed milk and dulce de leche are flavor and color. Condensed milk yields a muted orange pie with a vibrant, clean pumpkin flavor, while dulce de leche creates a medium to deep orange-brown pie with a more complex roasted and caramel-like pumpkin flavor. Texturally, they will both result in a creamy-soft custard.
Recommended Sugar Lab Recipes + Experiments
.png)


Got room for more dessert?
Subscribe to my Crumby Data newsletter! I share behind-the-scenes looks at recipe development, flavor testing for the Cakeculator, and life as a content creator. It’s free, lands in your inbox every few weeks, and you can unsubscribe anytime...no strings attached :)
Feel free to take a look at previous newsletters here!